Python
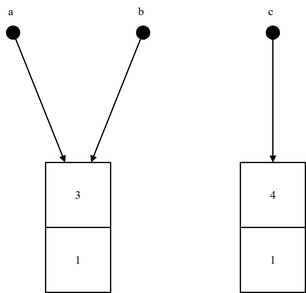
def main():
print('Python program')
if __name__ == '__main__':
main()
Output
Python program
上から順番に実行される
この場合,if文が実行され,main関数が呼び出される
C++
#include <iostream>
using namespace std;
int main(int argc, char** argv)
{
cout << "C++ program" <<
endl;
cin.get();
return 0;
}
Output
C++ program
main関数から実行される
cin.get関数を呼び出しているのは,Enterキーを押すとプログラムが終了するようにしているためであり,即座に終了させたければcin.get関数は呼び出さなくていい
Python
def main():
''' コメント1行目
コメント2行目 '''
print('Python program') # コメント
if __name__=='__main__':
main()
Output
Python program
'''と'''の間にあるものがコメント
#以降の行末までがコメント
C++
#include <iostream>
using namespace std;
int main(int argc, char** argv)
{
/* コメント1行目
コメント2行目 */
cout << "C++ program" <<
endl; // コメント
cin.get();
return 0;
}
Output
C++ program
/*と*/の間にあるものがコメント
//以降の行末までがコメント
Python
def main():
print('Line1')
print('Line2'); print('Line3')
print(\
'Line4'\
)
if __name__=='__main__':
main()
Output
Line1
Line2
Line3
Line4
1行に1つの命令
1行に複数の命令を書く場合はセミコロンで区切る
行をまたいで命令を書く場合は行末にバックスラッシュをつける
C++
#include <iostream>
using namespace std;
int main(int argc, char** argv)
{
cout << "Line1" << endl;
cout << "Line2" << endl;
cout << "Line3" << endl;
cout
<< "Line4"
<< endl;
cin.get();
return 0;
}
Output
Line1
Line2
Line3
Line4
命令文はセミコロンで区切る
1行に複数の命令がある場合も,行をまたぐ場合も,いずれにせよセミコロンまでが1つの命令
Python
def main():
print('Mc',end='')
print('Donald')
print()
print('Line1\nLine2')
print(2,'by',3,'is',2*3)
if __name__=='__main__':
main()
Output
McDonald
Line1
Line2
2 by 3 is 6
コンソール(コマンドプロンプトや端末(ターミナル)など)にテキストを出力するにはprint関数を使う
print関数は文字を出力して改行する
改行させたくない場合はendに''を指定する
\nは改行をあらわす
C++
#include <iostream>
using namespace std;
int main(int argc, char** argv)
{
cout << "Mc";
cout << "Donald" << endl;
cout << endl;
cout << "Line1\nLine2\n";
cout << 2 << " by " <<
3 << " is " << 2 * 3 << endl;
cin.get();
return 0;
}
Output
McDonald
Line1
Line2
2 by 3 is 6
コンソール(コマンドプロンプトや端末(ターミナル)など)にテキストを出力するにはcoutにストリーム演算子<<で文字を流し込む
endlをcoutに流し込むと改行する
\nは改行をあらわす
Python
def main():
print('directory\\file')
print(r'directory\file')
if __name__=='__main__':
main()
Output
directory\file
directory\file
\\で\を表す
r文字列は\がそのまま書ける
C++
#include <iostream>
using namespace std;
int main(int argc, char** argv)
{
cout << "directory\\file" <<
endl;
cout << R"(directory\file)" <<
endl;
cin.get();
return 0;
}
Output
directory\file
director\file
\\で\を表す
R文字列の()で囲まれた範囲では\がそのまま書ける
Python
import numpy as np
def main():
print(np.random.randint(0,10))
if __name__=='__main__':
main()
Output
1
importでライブラリを読み込む
この場合,np.randomのnpはnumpyライブラリをあらわし,randomはそのライブラリの中に入っている
C++
#include <iostream>
#include <random>
int main(int argc, char** argv)
{
std::random_device seed;
std::mt19937 srand(seed());
std::uniform_int_distribution<> rand(0, 9);
std::cout << rand(srand) << std::endl;
std::cin.get();
return 0;
}
Output
6
#includeでライブラリを読み込む
この場合,std::mt19937のstdはC++標準ライブラリをあらわし,mt19937はそのライブラリの中に入っている
Python
from numpy.random import randint
def main():
print(randint(0,10))
if __name__=='__main__':
main()
Output
9
ネームスペースnumpyを書くのを省略したい場合はfromを使ってimportをする
この場合,np.random.を付けることなくrandint関数を呼び出すことができる
C++
#include <iostream>
#include <random>
using namespace std;
int main(int argc, char** argv)
{
random_device seed;
mt19937 srand(seed());
uniform_int_distribution<> rand(0, 9);
cout << rand(srand) << endl;
cin.get();
return 0;
}
Output
9
ネームスペースstdを書くのを省略したい場合はusing namespaceを使う
この場合,std::を付けることなくmt19937クラスを利用することができる
Python
import random
import numpy as np
def main():
for _ in range(0,100):
print(random.randint(0,9),
'', end='')
print()
for _ in range(0,100):
print(np.random.randint(0,10),
'', end='')
if __name__=='__main__':
main()
Output
7 9 4 9 4 1 8 0 9 0 4 7 4 3 0 0 6 1 0 4 1 7 9 2 0 6 5 6 9 8 2 0 0 9 9 3 5 2 2 8 1 0 1 1 8 7 6 8 5 1 6 6 3 3 7 2 0 7 9 9 2 9 9 0 5 7 7 6 0 1 4 6 6 5 7 3 4 8 4 4 2 0 0 3 2 0 3 3 0 6 2 3 5 4 4 6 0 7 1 7
6 8 8 1 1 0 3 7 7 0 0 8 8 9 0 8 2 2 1 5 4 2 1 9 2 8 3 3 8 0 4 2 9 4 6 6 1 6 4 3 7 7 7 9 9 0 8 4 6 7 1 4 6 1 7 8 5 4 8 6 8 5 6 4 1 5 2 0 0 1 9 2 0 5 1 6 8 2 5 2 8 1 8 8 1 9 5 8 8 5 9 7 8 9 1 8 5 8 4 7
実行するたびに違う値になる
randomのrandintとnumpyのrandintは範囲の指定方法が違うので注意
C++
#include <iostream>
#include <random>
using namespace std;
int main(int argc, char** argv)
{
random_device srand;
mt19937 next(srand());
uniform_int_distribution<> rand(0, 9);
for (int i = 0; i < 100; i++)
cout << rand(next)
<< " ";
cout << endl;
cin.get();
return 0;
}
Output
5 2 7 6 2 2 2 9 7 8 0 4 2 3 9 7 0 1 1 0 3 9 9 2 3 1 0 3 6 0 2 0 9 9 0 3 8 2 1 2 3 3 8 2 3 3 0 7 4 6 8 1 5 1 0 5 6 6 5 9 4 8 1 6 4 5 9 3 0 5 8 8 8 4 7 6 3 1 8 0 7 8 7 7 7 2 2 0 8 6 0 3 0 0 2 5 4 0 6 0
random_deviceは実行するたびに違う値になるので,それを乱数の種として使用する
乱数ジェネレータとしてはmt19937を使うのがオススメ
Python
import sys
def main():
print(sys.argv[1])
if __name__=='__main__':
main()
Output
option
Command
python.exe myprogram.py option
コンソール(コマンドプロンプトや端末(ターミナル)など)でプログラムを実行する際,コマンドライン引数を設定することができるが,そのコマンドライン引数はargvで取得できる
argv[0]はプログラム名
argv[1]以降が引数
C++
#include <iostream>
using namespace std;
int main(int argc, char** argv)
{
cout << argv[1] << endl;
cin.get();
return 0;
}
Output
option
Command
MyProgram.exe option
コンソール(コマンドプロンプトや端末(ターミナル)など)でプログラムを実行する際,コマンドライン引数を設定することができるが,そのコマンドライン引数はargvで取得できる
argv[0]はプログラム名
argv[1]以降が引数
ちなみに,exeファイルにファイルをドラッグ&ドロップした場合,argvにそのファイル名が入る
なお,引数の数はargcに入っている
Python
def main():
a=200
b=1000
c=2.5
d=2.5
e='@'
f='abc'
g='xyz'
h=True
print(a,type(a))
print(b,type(b))
print(c,type(c))
print(d,type(d))
print(e,type(e))
print(f,type(f))
print(g,type(g))
print(h,type(h))
if __name__=='__main__':
main()
Output
200 <class 'int'>
1000 <class 'int'>
2.5 <class 'float'>
2.5 <class 'float'>
@ <class 'str'>
abc <class 'str'>
xyz <class 'str'>
True <class 'bool'>
変数の定義の際,データ型を書く必要はない
データ型をきちんと意識して実装すること
int型は整数の型で,表現できる数値に限界はない
float型は浮動小数点数の型で,64ビット(厳密には64ビットだと決まっているわけではないが)
str型は文字列の型
bool型はブール値の型
C++
#include <iostream>
using namespace std;
int main(int argc, char** argv)
{
unsigned char a = 200;
int b = 1000;
float c = 2.5f;
double d = 2.5;
char e = '@';
char f[4] = "abc";
string g = "xyz";
bool h = true;
cout << (int)a << " " <<
typeid(a).name() << " " << sizeof(a) << endl;
cout << b << " " <<
typeid(b).name() << " " << sizeof(b) << endl;
cout << c << " " <<
typeid(c).name() << " " << sizeof(c) << endl;
cout << d << " " <<
typeid(d).name() << " " << sizeof(d) << endl;
cout << e << " " <<
typeid(e).name() << " " << sizeof(e) << endl;
cout << f << " " <<
typeid(f).name() << " " << sizeof(f) << endl;
cout << g << " " <<
typeid(g).name() << " " << sizeof(g) << endl;
cout << h << " " <<
typeid(h).name() << " " << sizeof(h) << endl;
cin.get();
return 0;
}
Output
200 unsigned char 1
1000 int 4
2.5 float 4
2.5 double 8
@ char 1
abc char [4] 4
xyz class std::basic_string<char,struct std::char_traits<char>,class std::allocator<char> > 40
1 bool 1
変数の定義の際,データ型を書く必要がある
データ型をきちんと意識して実装すること
char型は整数の型で,8ビット
(signed) charは-128~+127
unsigned charは0~255
unsignedは符号なし,省略した場合は符号つき
int型は整数の型で,32ビット(厳密には32ビットだと決まっているわけではないが)
float型は浮動小数点数の型で,32ビット
double型は浮動小数点数の型で,64ビット
char型は1文字の型で,文字はシングルクォーテーションであらわす
char型の配列は文字列の型で,文字列はダブルクォーテーションであらわす
文字数+1のサイズのメモリ(配列の要素数)を確保しておく必要がある
string型は文字列の型
bool型はブール値の型
Python
def main():
print(1|2|4|8|16|32|64|128)
if __name__=='__main__':
main()
Output
255
ビット演算のORは|
ビット演算のANDは&
C++
#include <iostream>
using namespace std;
int main(int argc, char** argv)
{
cout << (1 | 2 | 4 | 8 | 16 | 32 | 64 | 128)
<< endl;
cin.get();
return 0;
}
Output
255
ビット演算のORは|
ビット演算のANDは&
Python
def main():
print(20%7)
print(3**2)
a=10
a+=1
a+=2
print(a)
if __name__=='__main__':
main()
Output
6
9
13
割り算の余りを計算する演算子は%
**演算子で累乗(べき乗)を計算する
++という演算子はない
C++
#include <iostream>
using namespace std;
int main(int argc, char** argv)
{
cout << (20 % 7) << endl;
cout << pow(3, 2) << endl;
int a = 10;
a++;
a += 2;
cout << a << endl;
cin.get();
return 0;
}
Output
6
9
13
割り算の余りを計算する演算子は%
pow関数で累乗(べき乗)を計算する
++というインクリメント演算子は1を足す演算子
Python
def main():
print(5//2)
print(5/2)
if __name__=='__main__':
main()
Output
2
2.5
整数の割り算は//
浮動小数点数の割り算は/
C++
#include <iostream>
using namespace std;
int main(int argc, char** argv)
{
cout << (5 / 2) << endl;
cout << (5.0 / 2.0) << endl;
cin.get();
return 0;
}
Output
2
2.5
5も2も整数なので5/2は整数同士の割り算
5.0も2.0も浮動小数点数なので5.0/2.0は浮動小数点数同士の割り算
Python
def main():
print(1e2)
print(1e-2)
if __name__=='__main__':
main()
Output
100.0
0.01
1e2は1×10²を表す
1e-2は1×10⁻²を表す
C++
#include <iostream>
using namespace std;
int main(int argc, char** argv)
{
cout << 1e2 << endl;
cout << 1e-2 << endl;
cin.get();
return 0;
}
Output
100
0.01
1e2は1×10²を表す
1e-2は1×10⁻²を表す
Python
import numpy as np
def main():
a=1
b=-1
a=np.sqrt(a)
b=np.sqrt(b)
print(a)
print(b)
print(np.isnan(a))
print(np.isnan(b))
if __name__=='__main__':
main()
Output
c:/!temp/pytest/myprogram.py:6: RuntimeWarning: invalid value encountered in sqrt
b=np.sqrt(b)
1.0
nan
False
True
NaN (Not a Number)はisnan関数で調べる
NaNが原因のバグがある場合,NaNの発生箇所を探すのに役立つ
isnan関数は根本的な解決にはならない
今回の場合,sqrtに負の値が入らないようなプログラムやデータにする
sqrtに負の値が入る可能性がある仕様なら,sqrtを呼び出す前にsqrtの引数をif文などでチェックする
sqrtを計算したあとで計算結果がNaNかチェックするのではなく,sqrtを計算する前に引数をチェックするプログラムを作る
C++
#include <iostream>
#include <cmath>
using namespace std;
int main(int argc, char** argv)
{
double a = 1.0;
double b = -1.0;
a = sqrt(a);
b = sqrt(b);
cout << a << endl;
cout << b << endl;
if (isnan(a)) cout << "true" <<
endl;
else cout << "false" << endl;
if (isnan(b)) cout << "true" <<
endl;
else cout << "false" << endl;
cin.get();
return 0;
}
Output
1
-nan(ind)
false
true
NaN (Not a Number)はisnan関数で調べる
NaNが原因のバグがある場合,NaNの発生箇所を探すのに役立つ
isnan関数は根本的な解決にはならない
今回の場合,sqrtに負の値が入らないようなプログラムやデータにする
sqrtに負の値が入る可能性がある仕様なら,sqrtを呼び出す前にsqrtの引数をif文などでチェックする
sqrtを計算したあとで計算結果がNaNかチェックするのではなく,sqrtを計算する前に引数をチェックするプログラムを作る
Python
def main():
a0=1
a1='abc'
a=(a0,a1)
print(a[0])
print(a[1])
b0,b1=a
print(b0)
print(b1)
if __name__=='__main__':
main()
Output
1
abc
1
abc
タプル(組)はカンマで表す
丸括弧で囲むのが普通
Pythonではタプルを多用する
タプルをそれぞれの要素に分解することもできる
C++
#include <iostream>
#include <tuple>
using namespace std;
int main(int argc, char** argv)
{
int a0 = 1;
string a1 = "abc";
auto a = make_tuple(a0, a1);
cout << get<0>(a) << endl;
cout << get<1>(a) << endl;
auto [b0, b1] = a;
cout << b0 << endl;
cout << b1 << endl;
cin.get();
return 0;
}
Output
1
abc
1
abc
タプル(組)が使えるライブラリもある
そのライブラリがタプルを使うことを前提としたライブラリならタプルを使ったほうがいい
タプルをほとんど使わないライブラリだけを使うなら,タプルは使わないほうがいい
2つ組みのタプルとしてpairが用意されているライブラリもある
タプルをそれぞれの要素に分解することもできる
Python
def main():
a=[0,0]
a[0]=10
a[1]=20
b=[2,3]
b[0]=b[1]+1
c=[[1,2],[3,4]]
d=[0]*2
d[0]=100
d[1]=200
print(a)
print(b)
print(c)
print(d)
if __name__=='__main__':
main()
Output
[10, 20]
[4, 3]
[[1, 2], [3, 4]]
[100, 200]
リスト
C++
#include <iostream>
using namespace std;
int main(int argc, char** argv)
{
int a[2];
a[0] = 10;
a[1] = 20;
int b[2] = { 2,3 };
b[0] = b[1] + 1;
int c[2][2] = { {1,2},{3,4} };
int* d;
d = new int[2];
d[0] = 100;
d[1] = 200;
cout << a[0] << " " <<
a[1] << endl;
cout << b[0] << " " <<
b[1] << endl;
cout << c[0][0] << " " <<
c[0][1] << " " << c[1][0] << " "
<< c[1][1] << endl;
cout << d[0] << " " <<
d[1] << endl;
cin.get();
return 0;
}
Output
10 20
4 3
1 2 3 4
100 200
配列
*のついた型はポインタ型と呼ばれる型
配列型もポインタ型
new演算子でメモリを確保できる
Python
def main():
a=5
b=2
print(float(a)/float(b))
c=[1,2]
d=1.01
print(c[int(d)])
if __name__=='__main__':
main()
Output
2.5
2
floatやintなどと書くことによりデータ型を変換できる
プログラムの意図をよく考え,適切にデータ型を変換して実装すること
C++
#include <iostream>
using namespace std;
int main(int argc, char** argv)
{
int a = 5;
int b = 2;
cout << (double)a / (double)b << endl;
int c[2] = { 1,2 };
double d = 1.01;
cout << c[(int)d] << endl;
cin.get();
return 0;
}
Output
2.5
2
doubleやintなどと書くことによりデータ型を変換できる
プログラムの意図をよく考え,適切にデータ型を変換して実装すること
Python
def main():
a='a'
b='b'
c=0
print(a+b)
print(a+str(c)+'c')
if __name__=='__main__':
main()
Output
ab
a0c
文字列同士は+演算子で連結できる
数値はstr型への型変換で文字列に変換する
C++
#include <iostream>
#include <string>
using namespace std;
int main(int argc, char** argv)
{
string a = "a";
string b = "b";
int c = 0;
cout << (a + b) << endl;
cout << (a + to_string(c) + "c")
<< endl;
cin.get();
return 0;
}
Output
ab
a0c
文字列同士は+演算子で連結できる
数値はto_string関数で文字列に変換する
Python
def main():
y=1234
m=5
d=6
a=f'{y:4d}/{m:2d}/{d:2d}'
b='{0:04d}/{1:02d}/{2:02d}'.format(y,m,d)
c='{0:d}/{1:d}/{2:d}'.format(y,m,d)
print(a)
print(b)
print(c)
if __name__=='__main__':
main()
Output
1234/ 5/ 6
1234/05/06
1234/5/6
format関数で文字列を整形できる
f文字列で文字列を整形できる
C++
#include <iostream>
#include <format>
using namespace std;
int main(int argc, char** argv)
{
int y = 1234;
int m = 5;
int d = 6;
int n = snprintf(nullptr, 0, "%4d/%2d/%2d",
y, m, d);
char* s = new char[n + 1];
snprintf(s, n + 1, "%4d/%2d/%2d", y,
m, d);
string a = s;
string b = format("{0:04d}/{1:02d}/{2:02d}",
y, m, d);
string c = format("{0:d}/{1:d}/{2:d}",
y, m, d);
cout << a << endl;
cout << b << endl;
cout << c << endl;
cin.get();
return 0;
}
Output
1234/ 5/ 6
1234/05/06
1234/5/6
format関数で文字列を整形できる
なお,format関数は最新のC++の機能であり,コンパイラによっては使用できない
format関数が使えない場合,snprintf関数を代わりに使う
Python
def main():
print('文字を入力してください')
s=input()
print("入力した文字は'"+s+"'です")
print('整数を入力してください')
i=int(input())
print("入力した整数は'"+str(i)+"'です")
print('実数を入力してください')
f=float(input())
print("入力した実数は'"+str(f)+"'です")
print('Enterキーを押してください')
input()
if __name__=='__main__':
main()
Output
文字を入力してください
abc
入力した文字は'abc'です
整数を入力してください
10
入力した整数は'10'です
実数を入力してください
1.5
入力した実数は'1.5'です
Enterキーを押してください
コンソールからの文字入力にはinput関数を使う
C++
#include <iostream>
using namespace std;
int main(int argc, char** argv)
{
string s;
cout << "文字を入力してください" <<
endl;
cin >> s;
cout << "入力した文字は'" << s <<
"'です" << endl;
int i;
cout << "整数を入力してください" <<
endl;
cin >> i;
cout << "入力した整数は'" << i <<
"'です" << endl;
double d;
cout << "実数を入力してください" <<
endl;
cin >> d;
cout << "入力した実数は'" << d <<
"'です" << endl;
cin.ignore();
cout << "Enterキーを押してください" <<
endl;
cin.get();
return 0;
}
Output
文字を入力してください
abc
入力した文字は'abc'です
整数を入力してください
10
入力した整数は'10'です
実数を入力してください
1.5
入力した実数は'1.5'です
Enterキーを押してください
コンソールからの文字入力はcinから変数にストリーム演算子>>で流し込む
Python
def main():
a=0
while True:
print(a)
a+=1
if a>=10:
break
if __name__=='__main__':
main()
Output
0
1
2
3
4
5
6
7
8
9
while文の範囲はインデントで表す
for文やif文なども同様
C++
#include <iostream>
using namespace std;
int main(int argc, char** argv)
{
int a = 0;
while (true) {
cout << a <<
endl;
a++;
if (a >= 10)break;
}
cin.get();
return 0;
}
Output
0
1
2
3
4
5
6
7
8
9
while文の範囲は{と}で囲まれた範囲
命令文1行だけの場合は{と}で囲まなくてもよい
for文やif文なども同様
Python
def main():
a,b,c=1,2,3
if a==0:
print('a==0')
elif a==1:
print('a==1')
else:
print('a==?')
if a==1 and b!=1:
print('a==1 and b!=1')
if not a==2 or b==2:
print('not a==2 or b==2')
if not (a==2 or b==2):
print('not (a==2 or b==2)')
if a<b and b<c:
print('a<b and b<c')
if c>b>a:
print('c>b>a')
if __name__=='__main__':
main()
Output
a==1
a==1 and b!=1
not a==2 or b==2
a<b and b<c
c>b>a
elifはelse ifの略
andやorやnotや==や!=や<や>や<=や>=などを論理演算子として使う
c>b>aのように演算子を複数つなげて使うことができる
C++
#include <iostream>
using namespace std;
int main(int argc, char** argv)
{
int a = 1, b = 2, c = 3;
if (a == 0)cout << "a==0" <<
endl;
else if (a == 1)cout << "a==1"
<< endl;
else cout << "a==?" << endl;
if (a == 1 && b != 1)cout << "a==1&&b!=1"
<< endl;
if (!(a == 2) || b == 2)cout << "!(a==2)||b==2"
<< endl;
if (!(a == 2 || b == 2))cout << "!(a==2||b==2)"
<< endl;
if (a < b && b < c)cout <<
"a<b&&b<c" << endl;
if (c > b > a)cout << "c>b>a"
<< endl;
cin.get();
return 0;
}
Output
a==1
a==1&&b!=1
!(a==2)||b==2
a<b&&b<c
elifに相当するのがelse if
&&や||や!や==や!=や<や>や<=や>=などを論理演算子として使う
c>b>aのように演算子を複数つなげて使うことはできない
この場合c>b&&b>aのようにする
Python
def main():
a=7
b='even' if a%2==0 else 'odd'
print(b)
if __name__=='__main__':
main()
Output
odd
命令文の途中のif文
(真の場合) if (条件) else (偽の場合)
C++
#include <iostream>
using namespace std;
int main(int argc, char** argv)
{
int a = 7;
string b = (a % 2 == 0) ? "even" : "odd";
cout << b << endl;
cin.get();
return 0;
}
Output
odd
3項演算子
(条件) ? (真の場合) : (偽の場合)
Python
def main():
a=[]
a.append(30)
a.append(40)
a.append(20)
a.append(10)
a.append(50)
print(a)
a.sort()
print(a)
print('メディアンは',a[len(a)//2])
if __name__=='__main__':
main()
Output
[30, 40, 20, 10, 50]
[10, 20, 30, 40, 50]
メディアンは 30
appendでリストに追加する
sort関数でソートする
len関数で長さを取得する
C++
#include <iostream>
#include <vector>
#include <algorithm>
using namespace std;
int main(int argc, char** argv)
{
vector<int> a;
a.push_back(30);
a.push_back(40);
a.push_back(20);
a.push_back(10);
a.push_back(50);
cout << a[0] << " " <<
a[1] << " " << a[2] << " " <<
a[3] << " " << a[4] << endl;
sort(a.begin(), a.end());
cout << a[0] << " " <<
a[1] << " " << a[2] << " " <<
a[3] << " " << a[4] << endl;
cout << "メディアンは" << a[a.size()
/ 2] << endl;
cin.get();
return 0;
}
Output
30 40 20 10 50
10 20 30 40 50
メディアンは30
vectorはリスト(vectorはリストではなく動的配列と呼ばれるのが普通)
<int>のように要素のデータ型を指定する
push_backでリストに追加する
sort関数でソートする
size関数で長さを取得する
Python
import numpy as np
def main():
a=[30,40,20,10,50]
print(a)
print('メディアンは',np.median(a))
print(a)
if __name__=='__main__':
main()
Output
[30, 40, 20, 10, 50]
メディアンは 30.0
[30, 40, 20, 10, 50]
メディアンを計算するだけならmedianのほうが速い
ソートはO(NlogN)だが選択はO(N)
元のリストはソートされない
C++
#include <iostream>
#include <vector>
#include <algorithm>
using namespace std;
int main(int argc, char** argv)
{
vector<int> a = { 30,40,20,10,50 };
for (int x : a)cout << x << "
";
cout << endl;
nth_element(a.begin(), a.begin() + a.size() / 2,
a.end());
cout << "メディアンは" << a[a.size()
/ 2] << endl;
for (int x : a)cout << x << "
";
cout << endl;
cin.get();
return 0;
}
Output
30 40 20 10 50
メディアンは30
10 20 30 40 50
メディアンを計算するだけならnth_elementのほうが速い
ソートはO(NlogN)だが選択はO(N)
元のリストは,メディアンだけは正しくソートされるが,他の数値は正しくソートされるとは限らない
nth_elementはメディアンを計算するのに使い,ソートするのには使わない
Python
def main():
data=[10,20,30,40,50]
sum=0
for val in data:
sum+=val
print(sum)
sum=0
for i in range(0,5):
sum+=data[i]
print(sum)
if __name__=='__main__':
main()
Output
150
150
Pythonのfor文は全てrange-based for文(foreach文)
C++
#include <iostream>
#include <vector>
#include <algorithm>
using namespace std;
int main(int argc, char** argv)
{
vector<int> data = { 10,20,30,40,50 };
int sum = 0;
for (int val : data)sum += val;
cout << sum << endl;
sum = 0;
for (int i = 0; i < 5; i++)sum += data[i];
cout << sum << endl;
cin.get();
return 0;
}
Output
150
150
range-based for文(foreach文)はfor(要素 : コレクション)のように書く
for(式1 ; 式2 ; 式3)のようなfor文も使える
ループに入る前に式1が実行される
ループの冒頭で式2が評価され,真ならループの中を実行,偽ならループを抜ける
ループの最後で式3が実行される
Python
def main():
data=[10,30,50,40,20]
maxval=0
maxinx=0
for i, val in enumerate(data):
if val>maxval:
maxval=val
maxinx=i
print(data)
print(maxval)
print(maxinx)
if __name__=='__main__':
main()
Output
[10, 30, 50, 40, 20]
50
2
enumerateがある
C++
#include <iostream>
#include <vector>
using namespace std;
int main(int argc, char** argv)
{
vector<int> data = { 10,30,50,40,20 };
int maxval = 0;
int maxinx = 0;
for (int i = 0; i < data.size(); i++) {
int val = data[i];
if (val > maxval) {
maxval
= val;
maxinx
= i;
}
cout << data[i] <<
" ";
}
cout << endl;
cout << maxval << endl;
cout << maxinx << endl;
cout << endl;
maxval = 0;
maxinx = 0;
int i;
vector<int>::iterator val;
for (i = 0, val = data.begin(); val != data.end();
i++, val++) {
if (*val > maxval) {
maxval
= *val;
maxinx
= i;
}
cout << *val <<
" ";
}
cout << endl;
cout << maxval << endl;
cout << maxinx << endl;
cin.get();
return 0;
}
Output
10 30 50 40 20
50
2
10 30 50 40 20
50
2
enumerateはない
Python
def main():
a=[2,4,8]
a=[256/b for b in a]
print(a)
if __name__=='__main__':
main()
Output
[128.0, 64.0, 32.0]
リスト内包表記が使える
C++
#include <iostream>
#include <vector>
using namespace std;
int main(int argc, char** argv)
{
int a[] = { 2,4,8 };
for (int i = 0; i < 3; i++) {
a[i] = 256 / a[i];
}
for (int i = 0; i < 3; i++)cout << a[i]
<< " ";
cout << endl;
vector<int> aa = { 2,4,8 };
for (int& bb : aa) {
bb = 256 / bb;
}
for (int cc : aa)cout << cc << "
";
cout << endl;
cin.get();
return 0;
}
Output
128 64 32
128 64 32
リスト内包表記は使えない
Python
def myfunc(a,b,c):
a+=1
b+=1
c[0]+=1
c[1]+=1
return str(a)+'+'+str(b)+'='+str(a+b)
def main():
x=1
y=2
z=[3,4]
w=myfunc(x,y,z)
print(x)
print(y)
print(z)
print(w)
if __name__=='__main__':
main()
Output
1
2
[4, 5]
2+3=5
関数の挙動は一般的なプログラミング言語と同じ
関数の中の変数の値が関数の外まで影響するのかしないのかよく考えながら実装すること
C++
#include <iostream>
#include <string>
using namespace std;
string myfunc(int a, int b, int* c) {
a++;
b++;
c[0]++;
c[1]++;
return to_string(a) + "+" + to_string(b)
+ "=" + to_string(a + b);
}
int main(int argc, char** argv)
{
int x = 1;
int y = 2;
int z[2] = { 3,4 };
string w = myfunc(x, y, z);
cout << x << endl;
cout << y << endl;
cout << z[0] << " " <<
z[1] << endl;
cout << w << endl;
cin.get();
return 0;
}
Output
1
2
4 5
2+3=5
関数の挙動は一般的なプログラミング言語と同じ
関数の中の変数の値が関数の外まで影響するのかしないのかよく考えながら実装すること
Python
def myfunc(a,b,c,d):
a=10
b[0]=20
c=[30,40]
d[0]=[50,60]
e=[70,80]
return e
def main():
a=1
b=[2]
c=[3,4]
d=[[5,6]]
e=[7,8]
e=myfunc(a,b,c,d)
print(a)
print(b)
print(c)
print(d)
print(e)
if __name__=='__main__':
main()
Output
1
[20]
[3, 4]
[[50, 60]]
[70, 80]
Pythonの関数の引数は全て参照渡しと言われているが,値渡しに相当する機能があるので注意が必要
C++
#include <iostream>
using namespace std;
int* myfunc(int a, int& b, int* c, int*& d) {
a = 10;
b = 20;
int* cc = new int[2]{ 30,40 };
c = cc;
int* dd = new int[2]{ 50,60 };
d = dd;
int* ee = new int[2]{ 70,80 };
return ee;
}
int main(int argc, char** argv)
{
int a = 1;
int b = 2;
int c[2] = { 3,4 };
int* d = new int[2]{ 5,6 };
int* e = new int[2]{ 7,8 };
e = myfunc(a, b, c, d);
cout << a << endl;
cout << b << endl;
cout << c[0] << " " <<
c[1] << endl;
cout << d[0] << " " <<
d[1] << endl;
cout << e[0] << " " <<
e[1] << endl;
cin.get();
return 0;
}
Output
1
20
3 4
50 60
70 80
関数の引数における参照渡しは&を使う
aはint型の値渡し,bはint型の参照渡し
aの内容は関数の外まで影響しない
bの内容は関数の外まで影響する
cはint*型の値渡し,dはint*型の参照渡し
cの内容は関数の外まで影響しない
dの内容は関数の外まで影響する
Python
a=1
def myfunc1(a):
a=2
def myfunc2():
a=3
def myfunc3():
global a
a=4
def main():
global a
print(a)
a=5
print(a)
myfunc1(a)
print(a)
myfunc2()
print(a)
myfunc3()
print(a)
while True:
a=6
break
print(a)
while True:
a=7
break
print(a)
if __name__=='__main__':
main()
Output
1
5
5
5
4
6
7
globalと指定された変数はグローバル変数として使うことができる
C++
#include <iostream>
using namespace std;
int a = 1;
void myfunc1(int a) {
a = 2;
}
void myfunc2() {
int a = 3;
}
void myfunc3() {
a = 4;
}
int main(int argc, char** argv)
{
cout << a << endl;
a = 5;
cout << a << endl;
myfunc1(a);
cout << a << endl;
myfunc2();
cout << a << endl;
myfunc3();
cout << a << endl;
while (true) {
int a = 6;
break;
}
cout << a << endl;
while (true) {
a = 7;
break;
}
cout << a << endl;
cin.get();
return 0;
}
Output
1
5
5
5
4
4
7
関数内で定義しなかった変数はグローバル変数を使う
Python
import numpy as np
class player:
def __init__(self,l):
self.life=l
def damage(self,d):
self.life-=d
def main():
hero=player(100)
for _ in range(0,5):
d=np.random.randint(0,20)
print('life='+str(hero.life)
+' damage='+str(d),end='')
hero.damage(d)
print(' life='+str(hero.life))
if __name__ == '__main__':
main()
Output
life=100 damage=16 life=84
life=84 damage=11 life=73
life=73 damage=3 life=70
life=70 damage=15 life=55
life=55 damage=0 life=55
たかが数千行ごときのプログラムにオブジェクト指向プログラミングをするほどのこともないので解説は省略します
C++
#include <iostream>
#include <string>
#include <random>
using namespace std;
class player {
public:
int life = 0;
player(int l) {
life = l;
}
void damage(int d) {
life -= d;
}
};
int main(int argc, char** argv)
{
random_device srand;
mt19937 next(srand());
uniform_int_distribution<> rand(0, 19);
player hero(100);
for (int i = 0; i < 5; i++) {
int d = rand(next);
cout << "life="
+ to_string(hero.life)
+
" damage=" + to_string(d);
hero.damage(d);
cout << " life="
+ to_string(hero.life) << endl;
}
cin.get();
return 0;
}
Output
life=100 damage=10 life=90
life=90 damage=3 life=87
life=87 damage=12 life=75
life=75 damage=13 life=62
life=62 damage=4 life=58
たかが数千行ごときのプログラムにオブジェクト指向プログラミングをするほどのこともないので解説は省略します
Python
class card:
def __init__(self,n):
self.name=n
def __repr__(self):
return self.name
class item(card):
def __init__(self,n,e):
super().__init__(n)
self.energy=e
def __repr__(self):
return self.name+'('+str(self.energy)+')'
class idol(card):
def __init__(self,n,s):
super().__init__(n)
self.stamina=s
def __repr__(self):
return self.name+'('+str(self.stamina)+')'
def charge(self,i):
self.stamina+=i.energy
def main():
cards=[idol('Anzu Futaba',100),item('Candy',10)]
print(cards)
cards[0].charge(cards[1])
cards.remove(cards[1])
print(cards)
if __name__ == '__main__':
main()
Output
[Anzu Futaba(100), Candy(10)]
[Anzu Futaba(110)]
たかが数千行ごときのプログラムにオブジェクト指向プログラミングをするほどのこともないので解説は省略します
C++
#include <iostream>
#include <string>
using namespace std;
class card {
public:
string name;
int stamina = 0;
int energy = 0;
card(string n) {
name = n;
}
virtual string tostring() {
return name;
}
virtual void charge(card* i) {
}
};
class item :public card {
public:
item(string n, int e) : card(n) {
this->energy = e;
}
string tostring() override {
return this->name +
"(" + to_string(this->energy) + ")";
}
};
class idol : public card {
public:
idol(string n, int s) : card(n) {
this->stamina = s;
}
string tostring() override {
return this->name +
"(" + to_string(this->stamina) + ")";
}
void charge(card* i) override {
this->stamina += i->energy;
}
};
int main(int argc, char** argv)
{
vector<card*> cards = { new idol("Anzu
Futaba", 100), new item("Candy", 10) };
for (card* c : cards)cout << c->tostring()
<< " ";
cout << endl;
cards[0]->charge(cards[1]);
cards.erase(cards.begin() + 1);
for (card* c : cards)cout << c->tostring()
<< " ";
cout << endl;
cin.get();
return 0;
}
Output
Anzu Futaba(100) Candy(10)
Anzu Futaba(110)
たかが数千行ごときのプログラムにオブジェクト指向プログラミングをするほどのこともないので解説は省略します
Python
def addfunc(a):
return lambda b: a+b
class addclass:
def __init__(self,d):
self.e=d
def __call__(self,f):
return self.e+f
def main():
print(addfunc(1)(2))
print(addclass(1)(2))
if __name__=='__main__':
main()
Output
3
3
関数に引数を2つ与えるときはfunc(value1,value2)のように呼び出すから,func(value1)(value2)はバグだ,みたいに思ってしまうことも多いだろう
いまどきのプログラミング言語は機能が豊富で,ありとあらゆるプログラムが書けるので,常識にとらわれてはいけない
そのライブラリの使用方法や関数の定義などをよく理解して実装しよう
この授業ではラムダ式や独自クラスを使わずに実装できるのでこのソースコードの解説はしない
C++
#include <iostream>
using namespace std;
auto addfunc(int a) {
return [a](int b) { return a + b; };
}
class addclass {
int result = 0;
public:
addclass operator()(int val) {
this->result += val;
return *this;
}
operator int() {
return result;
}
};
int main() {
cout << addfunc(1)(2) << endl;
addclass add;
cout << add(1)(2) << endl;
return 0;
}
Output
3
3
関数に引数を2つ与えるときはfunc(value1,value2)のように呼び出すから,func(value1)(value2)はバグだ,みたいに思ってしまうことも多いだろう
いまどきのプログラミング言語は機能が豊富で,ありとあらゆるプログラムが書けるので,常識にとらわれてはいけない
そのライブラリの使用方法や関数の定義などをよく理解して実装しよう
この授業ではラムダ式や独自クラスを使わずに実装できるのでこのソースコードの解説はしない
Python
def week():
week=['mon','tue','wed','thu','fri','sat','sun']
while True:
for s in week:
yield
s
def main():
generator=week()
for _ in range(0,30):
print(next(generator))
if __name__=='__main__':
main()
Output
mon
tue
wed
thu
fri
sat
sun
mon
tue
wed
thu
fri
sat
sun
mon
tue
wed
thu
fri
sat
sun
mon
tue
wed
thu
fri
sat
sun
mon
tue
この授業ではジェネレータを使わずに実装できるので解説はしない
C++
#include <iostream>
#include <coroutine>
#include <vector>
using namespace std;
template <typename T>
struct generator {
struct promise_type {
T value_;
auto get_return_object()
{
return
generator{ *this };
};
auto initial_suspend()
{
return
suspend_always{};
}
auto final_suspend() noexcept
{
return
suspend_always{};
}
auto yield_value(T v)
{
value_
= v;
return
suspend_always{};
}
void return_void() {}
void unhandled_exception()
{ terminate(); }
};
using coro_handle = coroutine_handle<promise_type>;
struct iterator {
coro_handle coro_;
bool done_;
iterator& operator++()
{
coro_.resume();
done_
= coro_.done();
return
*this;
}
bool operator!=(const iterator&
rhs) const
{
return
done_ != rhs.done_;
}
T operator*() const
{
return
coro_.promise().value_;
}
};
~generator()
{
if (coro_)
coro_.destroy();
}
generator(generator const&) = delete;
generator(generator&& rhs) noexcept
: coro_(exchange(rhs.coro_,
nullptr)) {}
iterator begin()
{
coro_.resume();
return { coro_, coro_.done()
};
}
iterator end()
{
return { {}, true };
}
private:
explicit generator(promise_type& p)
: coro_(coro_handle::from_promise(p))
{}
coro_handle coro_;
};
generator<string> week()
{
vector<string> week = { "mon","tue","wed","thu","fri","sat","sun"
};
while (true) {
for (string s : week) {
co_yield
s;
}
}
}
int main()
{
generator<string> g = week();
int i = 0;
for (auto s:g) {
cout << s <<
endl;
i++;
if (i == 30)break;
}
}
Output
mon
tue
wed
thu
fri
sat
sun
mon
tue
wed
thu
fri
sat
sun
mon
tue
wed
thu
fri
sat
sun
mon
tue
wed
thu
fri
sat
sun
mon
tue
この授業ではジェネレータを使わずに実装できるので解説はしない
C++のこのプログラムはあまり参考にしなくていい
Python
def func(a,b):
assert abs(b)>1e-15, '第2引数がゼロだよ'
return a/b
def main():
a=0
b=1
print(func(a,b))
print(func(b,a))
if __name__=='__main__':
main()
Output
0.0
Traceback (most recent call last):
File "c:/!temp/pytest/myprogram.py", line 10, in
<module>
main()
File "c:/!temp/pytest/myprogram.py", line 8, in main
print(func(b,a))
File "c:/!temp/pytest/myprogram.py", line 2, in func
assert abs(b)>1e-15, '第2引数がゼロだよ'
AssertionError: 第2引数がゼロだよ
学生のみなさんは自分でアサーションを設置したりしないようなので,アサーションについては知らなくてOKです
C++
#include <iostream>
#include <cassert>
using namespace std;
double func(double a, double b)
{
assert(abs(b) > 1e-15);
return a / b;
}
int main(int argc, char** argv)
{
double a = 0.0;
double b = 1.0;
cout << func(a, b) << endl;
cout << func(b, a) << endl;
cin.get();
return 0;
}
Output
0
Assertion failed: abs(b) > 1e-15, file C:\!temp\新しいフォルダー\PhotometricStereo\PhotometricStereo\PhotometricStereo.cpp, line 6
学生のみなさんは自分でアサーションを設置したりしないようなので,アサーションについては知らなくてOKです
Python
import numpy as np
def main():
a=np.zeros((3,2),dtype=np.float64)
a[1,0]=1
print(a)
rows,cols=a.shape
print('行の数は',rows,'で列の数は',cols)
if __name__=='__main__':
main()
Output
[[0. 0.]
[1. 0.]
[0. 0.]]
行の数は 3 で列の数は 2
numpyのzerosでゼロで初期化された行列を作成することができる
引数で行列の行と列を指定する
dtypeで要素のデータ型を指定する
例えば,np.float64で64ビット浮動小数点数を表し,np.uint8で8ビット符号なし整数を表す
shapeを使うと行列の行数と列数を取得できる
[行番号,列番号]で要素にアクセスする
C++
#include <iostream>
using namespace std;
#include <opencv2/opencv.hpp>
using namespace cv;
int main(int argc, char** argv)
{
Mat a = Mat::zeros(3, 2, CV_64F);
a.at<double>(1, 0) = 1.0;
cout << a << endl;
cout << "行の数は" << a.rows
<< "で列の数は" << a.cols << endl;
cin.get();
return 0;
}
Output
[0, 0;
1, 0;
0, 0]
行の数は3で列の数は2
OpenCVのMat::zerosでゼロで初期化された行列を作成することができる
引数で行列の行と列を指定する
引数で要素のデータ型を指定する
例えば,CV_64Fで64ビット浮動小数点数を表し,CV_8Uで8ビット符号なし整数を表す
rowsとcolsを使うと行列の行数と列数を取得できる
at<要素のデータ型>(行番号,列番号)で要素にアクセスする
Python
import numpy as np
def main():
a=np.array([[1,2],[2,4]],dtype=np.float64)
b=np.array([[3],[1]],dtype=np.float64)
c=a@b
print(a)
print(b)
print(c)
if __name__=='__main__':
main()
Output
[[1. 2.]
[2. 4.]]
[[3.]
[1.]]
[[ 5.]
[10.]]
np.arrayでリストをnumpy行列に変換できる
行列同士のかけ算は@を使う
C++
#include <iostream>
using namespace std;
#include <opencv2/opencv.hpp>
using namespace cv;
int main(int argc, char** argv)
{
Mat a = (Mat_<double>(2, 2) << 1, 2,
2, 4);
Mat b = (Mat_<double>(2, 1) << 3, 1);
Mat c = a * b;
cout << a << endl;
cout << b << endl;
cout << c << endl;
cin.get();
return 0;
}
Output
[1, 2;
2, 4]
[3;
1]
[5;
10]
Mat_<データ型>(行,列)にストリーム演算子<<で値を流し込むことで,その数値の行列を作成できる
行列同士のかけ算は*を使う
Python
import numpy as np
def main():
a=np.array([[0,1,2,3,4],[5,6,7,8,9]],
dtype=np.float64)
b=a[:,1:4]
print(a)
print(b)
if __name__=='__main__':
main()
Output
[[0. 1. 2. 3. 4.]
[5. 6. 7. 8. 9.]]
[[1. 2. 3.]
[6. 7. 8.]]
スライス(部分行列)
:は全ての行を表す
1:4は1列目以上4列目未満を表す
ただし左端を0列目とする
C++
#include <iostream>
using namespace std;
#include <opencv2/opencv.hpp>
using namespace cv;
int main(int argc, char** argv)
{
Mat a = (Mat_<double>(2, 5) <<
0, 1, 2, 3, 4,
5, 6, 7, 8, 9);
Mat b = a(Range::all(), Range(1, 4));
cout << a << endl;
cout << b << endl;
cin.get();
return 0;
}
Output
[0, 1, 2, 3, 4;
5, 6, 7, 8, 9]
[1, 2, 3;
6, 7, 8]
スライス(部分行列)
Range::all()は全ての行を表す
Range(1,4)は1列目以上4列目未満を表す
ただし左端を0列目とする
Python
import numpy as np
def main():
a=np.array([[2,0],[0,2]],dtype=np.float64)
b=np.linalg.inv(a)
c=a@b
print(a)
print(b)
print(c)
if __name__=='__main__':
main()
Output
[[2. 0.]
[0. 2.]]
[[0.5 0. ]
[0. 0.5]]
[[1. 0.]
[0. 1.]]
numpyのlinalgのinvで逆行列を計算できる
C++
#include <iostream>
using namespace std;
#include <opencv2/opencv.hpp>
using namespace cv;
int main(int argc, char** argv)
{
Mat a = (Mat_<double>(2, 2) << 2, 0,
0, 2);
Mat b = a.inv();
Mat c = a * b;
cout << a << endl;
cout << b << endl;
cout << c << endl;
cin.get();
return 0;
}
Output
[2, 0;
0, 2]
[0.5, 0;
0, 0.5]
[1, 0;
0, 1]
OpenCVのMatのinvで逆行列を計算できる
Python
import numpy as np
def main():
a=np.array([[1,2],[2,3]],dtype=np.float64)
b=np.array([[2],[2]],dtype=np.float64)
x=np.linalg.solve(a,b)
print(a)
print(b)
print(x)
print('連立線形方程式')
print(a[0,0],'x +',a[0,1],'y =',b[0,0])
print(a[1,0],'x +',a[1,1],'y =',b[1,0])
print('の解は')
print('x =',x[0,0])
print('y =',x[1,0])
if __name__=='__main__':
main()
Output
[[1. 2.]
[2. 3.]]
[[2.]
[2.]]
[[-2.]
[ 2.]]
連立線形方程式
1.0 x + 2.0 y = 2.0
2.0 x + 3.0 y = 2.0
の解は
x = -2.0
y = 2.0
solve関数により連立線形方程式Ax=bの問題を解くことができる
Aとbが入力でxを求めたい問題
Aが行列でxとbがベクトル
Aの逆行列をbにかける関数
C++
#include <iostream>
using namespace std;
#include <opencv2/opencv.hpp>
using namespace cv;
int main(int argc, char** argv)
{
Mat a = (Mat_<double>(2, 2) << 1, 2,
2, 3);
Mat b = (Mat_<double>(2, 1) << 2, 2);
Mat x;
solve(a, b, x);
cout << a << endl;
cout << b << endl;
cout << x << endl;
cout << "連立線形方程式" << endl;
cout << a.at<double>(0, 0) <<
"x+" << a.at<double>(0, 1) << "y="
<< b.at<double>(0, 0) << endl;
cout << a.at<double>(1, 0) <<
"x+" << a.at<double>(1, 1) << "y="
<< b.at<double>(1, 0) << endl;
cout << "の解は" << endl;
cout << "x=" << x.at<double>(0,
0) << ", y=" << x.at<double>(1, 0) <<
endl;
cin.get();
return 0;
}
Output
[1, 2;
2, 3]
[2;
2]
[-2;
2]
連立線形方程式
1x+2y=2
2x+3y=2
の解は
x=-2, y=2
solve関数により連立線形方程式Ax=bの問題を解くことができる
Aとbが入力でxを求めたい問題
Aが行列でxとbがベクトル
Aの逆行列をbにかける関数
Python
import numpy as np
def main():
a=np.ones((2,1),dtype=np.float64)
b=a
c=a.copy()
a[0,0]=2
b[0,0]=3
c[0,0]=4
print(a)
print(b)
print(c)
if __name__=='__main__':
main()
Output
[[3.]
[1.]]
[[3.]
[1.]]
[[4.]
[1.]]
b=aのように書くと参照が代入されてしまう
bを変えるとaも同じように変わり,aを変えるとbも同じように変わる
aもbも同じ実体を指している
c=a.copy()のように複製を作ってから代入すれば,aとcは別々の行列になる
C++
#include <iostream>
using namespace std;
#include <opencv2/opencv.hpp>
using namespace cv;
int main(int argc, char** argv)
{
Mat a = Mat::ones(2, 1, CV_64F);
Mat b = a;
Mat c = a.clone();
a.at<double>(0, 0) = 2;
b.at<double>(0, 0) = 3;
c.at<double>(0, 0) = 4;
cout << a << endl;
cout << b << endl;
cout << c << endl;
cin.get();
return 0;
}
Output
[3;
1]
[3;
1]
[4;
1]
b=aのように書くと参照が代入されてしまう
bを変えるとaも同じように変わり,aを変えるとbも同じように変わる
aもbも同じ実体を指している
c=a.clone()のように複製を作ってから代入すれば,aとcは別々の行列になる
Python
import numpy as np
def main():
a=np.array([[1,0],[0,2]],dtype=np.float64)
u,w,vt=np.linalg.svd(a,full_matrices=False)
print('特異値分解の結果')
print('A =',a)
print('U =',u)
print('W =',w)
print('V^T =',vt)
w=np.diag(w)
check=u@w@vt
print('U W V^T =',check)
if __name__=='__main__':
main()
Output
特異値分解の結果
A = [[1. 0.]
[0. 2.]]
U = [[0. 1.]
[1. 0.]]
W = [2. 1.]
V^T = [[0. 1.]
[1. 0.]]
U W V^T = [[1. 0.]
[0. 2.]]
特異値分解SVDの引数としてfull_matricesにFalseを指定すること
Trueにして呼び出す意味はない
numpyのlinalgのsvdの引数として分解したい行列を指定する
計算結果はU,W,V^Tの順番に返ってくる
VではなくV^Tで返ってくる
Wは行列形式ではなく,対角成分のみのベクトル形式で返ってくる
diag関数で対角行列に変換できる
C++
#include <iostream>
#include <intrin.h>
using namespace std;
#include <opencv2/opencv.hpp>
using namespace cv;
int main(int argc, char** argv)
{
_mm_setcsr(_mm_getcsr() | 0x8040);
Mat a = (Mat_<double>(2, 2) << 1, 0,
0, 2);
SVD svd(a);
cout << "特異値分解の結果" << endl;
cout << "A=" << a <<
endl;
cout << "U=" << svd.u <<
endl;
cout << "W=" << svd.w <<
endl;
cout << "V^T=" << svd.vt
<< endl;
Mat w = Mat::diag(svd.w);
Mat check = svd.u * w * svd.vt;
cout << "U W V^T = " << check
<< endl;
cin.get();
return 0;
}
Output
特異値分解の結果
A=[1, 0;
0, 2]
U=[0, 1;
1, 0]
W=[2;
1]
V^T=[0, 1;
1, 0]
U W V^T = [1, 0;
0, 2]
_mm_setcsr(_mm_getcsr()|0x8040);は「おまじない」として呼ぶ
これを呼ぶと速くなるが,よく分からなければ消してよい
特異値分解SVDクラスのコンストラクタとして分解したい行列を指定する
メンバ変数としてU,W,V^Tを取得できる
VではなくV^Tの形式
Wは行列形式ではなく,対角成分のみのベクトル形式で返ってくる
diag関数で対角行列に変換できる
Python
def main():
output=['This is','a pen']
output=[s+'\n' for s in output]
with open('text.txt',mode='w') as f:
f.writelines(output)
with open('text.txt',mode='r') as f:
input=f.readlines()
input=[s.replace('\n','') for s in input]
print(input)
if __name__=='__main__':
main()
Output
['This is', 'a pen']
text.txt
This is
a pen
open関数でファイルを開くことができる
withの範囲内でファイルが開かれていて,withの範囲外に出るとファイルは閉じられる
open関数のmodeに,ファイルを読むモードか書くモードかを指定する
writelines関数でリスト内の文字列を出力できる
改行は出力されないので,改行コードをリスト内に入れておく
readlines関数でテキストファイルの全ての行をリストに読み込む
改行コードが付いているので,邪魔なら取り除く
C++
#include <iostream>
#include <string>
#include <vector>
#include <fstream>
using namespace std;
int main(int argc, char** argv)
{
vector<string> output = { "This is","a
pen" };
ofstream ofs;
ofs.open("text.txt", ios::out | ios::trunc);
for (string item : output)ofs << item <<
endl;
ofs.close();
vector<string> input;
ifstream ifs;
ifs.open("text.txt", ios::in);
while (!ifs.eof()) {
string item;
getline(ifs, item);
input.push_back(item);
}
ifs.close();
for (string item : input)cout << item <<
endl;
cin.get();
return 0;
}
Output
This is
a pen
text.txt
This is
a pen
open関数でファイルを開くことができる
最後にclose関数でファイルを閉じること
open関数の引数に,ファイルを入力するモードか出力するモードかを指定する
ofstreamオブジェクトに流し込むことで,リスト内の文字列を出力できる
getline関数でテキストファイルの全ての行をリストに読み込む
Python
import numpy as np
def main():
output=np.array([[1,2],[3,4],[5,6]],dtype=np.float64)
with open('binary.bin',mode='wb') as f:
output.astype(np.float32).tofile(f)
with open('binary.bin',mode='rb') as f:
input=np.fromfile(f,dtype=np.float32)
input=input.astype(np.float64).reshape((3,2))
print(input)
if __name__=='__main__':
main()
Output
[[1. 2.]
[3. 4.]
[5. 6.]]
binary.bin
00 00 80 3F 00 00 00 40
00 00 40 40 00 00 80 40
00 00 A0 40 00 00 C0 40
という16進数の24バイトのファイル
32ビット浮動小数点数の生データ
C++
#include <iostream>
#include <fstream>
using namespace std;
#include <opencv2/opencv.hpp>
using namespace cv;
int main(int argc, char** argv)
{
Mat output = (Mat_<double>(3, 2) <<
1, 2, 3, 4, 5, 6);
ofstream ofs;
ofs.open("binary.bin", ios::out | ios::trunc
| ios::binary);
for (int i = 0; i < output.rows; i++) {
for (int j = 0; j <
output.cols; j++) {
float
val;
val
= (float)output.at<double>(i, j);
ofs.write((char*)&val,
sizeof(float));
}
}
ofs.close();
Mat input = Mat::zeros(3, 2, CV_64F);
ifstream ifs;
ifs.open("binary.bin", ios::in | ios::binary);
for (int i = 0; i < input.rows; i++) {
for (int j = 0; j <
input.cols; j++) {
float
val;
ifs.read((char*)&val,
sizeof(float));
input.at<double>(i,
j) = val;
}
}
ifs.close();
cout << input << endl;
cin.get();
return 0;
}
Output
[1, 2;
3, 4;
5, 6]
binary.bin
00 00 80 3F 00 00 00 40
00 00 40 40 00 00 80 40
00 00 A0 40 00 00 C0 40
という16進数の24バイトのファイル
32ビット浮動小数点数の生データ
Python
import numpy as np
def main():
output=np.array([[1,2],[3,4],[5,6]],dtype=np.float64)
np.save('datafile',output)
input=np.load('datafile.npy')
print(input)
if __name__=='__main__':
main()
Output
[[1. 2.]
[3. 4.]
[5. 6.]]
Output file
datafile.npy
numpy行列ファイル形式で入出力する場合はload/save関数を使う
基本的に他のプログラミング言語ではnumpy行列ファイルの読み書きはできない
Python
import os
def main():
if os.path.exists('directory'):
print('既にあります')
else:
print('ディレクトリを作成します')
os.mkdir('directory')
if __name__=='__main__':
main()
Output
ディレクトリを作成します
Created directory
directory
osのpathのexistsでディレクトリが存在するか確認できる
osのmkdirでディレクトリを作成できる
C++
#include <iostream>
#include <filesystem>
using namespace std;
int main(int argc, char** argv)
{
if (filesystem::exists("directory"))
{
cout << "既にあります"
<< endl;
}
else {
cout << "ディレクトリを作成します"
<< endl;
filesystem::create_directory("directory");
}
cin.get();
return 0;
}
Output
ディレクトリを作成します
Created directory
directory
filesystemのexistsでディレクトリが存在するか確認できる
filesystemのcreate_directoryでディレクトリを作成できる
filesystemは比較的新しいC++の機能なので,コンパイラによっては使用できない
filesystemが使えない場合はsys/stat.hやdirect.hに入っている関数を使う
Python
import cv2
def main():
input=cv2.imread('input.bmp',cv2.IMREAD_GRAYSCALE)
if input is None:
print('ファイルを読み込めません')
return
rows,cols=input.shape
output=input.copy()
for y in range(0,rows):
for x in range(0,cols):
sum=0
num=0
for
yy in range(y-1,y+2):
for
xx in range(x-1,x+2):
if
yy>=0 and xx>=0 and yy<rows and xx<cols:
sum+=input[yy,xx]
num+=1
output[y,x]=sum/num
cv2.imwrite('output.bmp',output)
cv2.imshow('OpenCV program', output)
cv2.waitKey()
cv2.destroyAllWindows()
if __name__=='__main__':
main()
画像を読み込んで何らかの処理をして画像を出力するサンプルソースコード
imread関数に読み込む画像ファイル名と,グレースケールとして読み込むかカラーとして読み込むかを指定する
shapeにより画像の行数と列数が分かる
モノクロ画像の画素(x,y)のデータは[y,x]の添え字で指定する
カラー画像のRGBは[y,x,2],[y,x,1],[y,x,0]の添え字で指定する
imwriteで画像ファイルを出力,imshowで画像をウィンドウ表示,waitKeyでキーが押されるまで待機,destroyAllWindowsでウィンドウを閉じる
C++
#include <iostream>
using namespace std;
#include <opencv2/opencv.hpp>
using namespace cv;
int main(int argc, char** argv)
{
Mat input = imread("input.bmp", IMREAD_GRAYSCALE);
if (input.empty()) {
cout << "ファイルを読み込めません"
<< endl;
return 1;
}
Mat output = input.clone();
for (int y = 0; y < input.rows; y++) {
for (int x = 0; x <
input.cols; x++) {
double
sum = 0.0;
int
num = 0;
for
(int yy = y - 1; yy <= y + 1; yy++) {
for
(int xx = x - 1; xx <= x + 1; xx++) {
if
(yy >= 0 && xx >= 0 && yy < input.rows &&
xx < input.cols) {
sum
+= (double)input.at<unsigned char>(yy, xx);
num++;
}
}
}
output.at<unsigned
char>(y, x) = (unsigned char)(sum / (double)num);
}
}
imwrite("output.bmp", output);
imshow("OpenCV program", output);
waitKey();
destroyAllWindows();
return 0;
}
画像を読み込んで何らかの処理をして画像を出力するサンプルソースコード
imread関数に読み込む画像ファイル名と,グレースケールとして読み込むかカラーとして読み込むかを指定する
rowsとcolsにより画像の行数と列数が分かる
モノクロ画像の画素(x,y)のデータはat<uchar>(y,x)で指定する
カラー画像のRGBはat<Vec3b>(y,x)[2], at<Vec3b>(y,x)[1], at<Vec3b>(y,x)[0] で指定する
なお,Vec3bは3チャンネルのucharを表す型である
imwriteで画像ファイルを出力,imshowで画像をウィンドウ表示,waitKeyでキーが押されるまで待機,destroyAllWindowsでウィンドウを閉じる
Python
import cv2
def main():
input=cv2.imread('input.bmp',cv2.IMREAD_COLOR)
if input is None:
print('ファイルを読み込めません')
return
rows,cols,_=input.shape
output=input.copy()
for y in range(0,rows):
for x in range(0,cols):
r=input[y,x,2]
g=input[y,x,1]
b=input[y,x,0]
output[y,x,2]=0.9*r
output[y,x,1]=0.7*g
output[y,x,0]=0.4*b
cv2.imwrite('output.bmp',output)
cv2.imshow('OpenCV program', output)
cv2.waitKey()
cv2.destroyAllWindows()
if __name__=='__main__':
main()
画像を読み込んで何らかの処理をして画像を出力するサンプルソースコード
imread関数に読み込む画像ファイル名と,グレースケールとして読み込むかカラーとして読み込むかを指定する
shapeにより画像の行数と列数が分かる
モノクロ画像の画素(x,y)のデータは[y,x]の添え字で指定する
カラー画像のRGBは[y,x,2],[y,x,1],[y,x,0]の添え字で指定する
imwriteで画像ファイルを出力,imshowで画像をウィンドウ表示,waitKeyでキーが押されるまで待機,destroyAllWindowsでウィンドウを閉じる
C++
#include <iostream>
using namespace std;
#include <opencv2/opencv.hpp>
using namespace cv;
int main(int argc, char** argv)
{
Mat input = imread("input.bmp", IMREAD_COLOR);
if (input.empty()) {
cout << "ファイルを読み込めません"
<< endl;
return 1;
}
Mat output = input.clone();
for (int y = 0; y < input.rows; y++) {
for (int x = 0; x <
input.cols; x++) {
unsigned
char r = input.at<Vec3b>(y, x)[2];
unsigned
char g = input.at<Vec3b>(y, x)[1];
unsigned
char b = input.at<Vec3b>(y, x)[0];
output.at<Vec3b>(y,
x)[2] = (unsigned char)(0.9 * (double)r);
output.at<Vec3b>(y,
x)[1] = (unsigned char)(0.7 * (double)g);
output.at<Vec3b>(y,
x)[0] = (unsigned char)(0.4 * (double)b);
}
}
imwrite("output.bmp", output);
imshow("OpenCV program", output);
waitKey();
destroyAllWindows();
return 0;
}
画像を読み込んで何らかの処理をして画像を出力するサンプルソースコード
imread関数に読み込む画像ファイル名と,グレースケールとして読み込むかカラーとして読み込むかを指定する
rowsとcolsにより画像の行数と列数が分かる
モノクロ画像の画素(x,y)のデータはat<uchar>(y,x)で指定する
カラー画像のRGBはat<Vec3b>(y,x)[2], at<Vec3b>(y,x)[1], at<Vec3b>(y,x)[0] で指定する
なお,Vec3bは3チャンネルのucharを表す型である
imwriteで画像ファイルを出力,imshowで画像をウィンドウ表示,waitKeyでキーが押されるまで待機,destroyAllWindowsでウィンドウを閉じる
Python
import numpy as np
import cv2
def main():
a0=np.array([
[111,121,131,141,151],
[211,221,231,241,251],
[311,321,331,341,351],
[411,421,431,441,451]],
dtype=np.int32)
a1=np.array([
[112,122,132,142,152],
[212,222,232,242,252],
[312,322,332,342,352],
[412,422,432,442,452]],
dtype=np.int32)
a2=np.array([
[113,123,133,143,153],
[213,223,233,243,253],
[313,323,333,343,353],
[413,423,433,443,453]],
dtype=np.int32)
a=cv2.merge((a0,a1,a2))
print('a=',a)
print(a.shape)
b=cv2.split(a)
print('b0=',b[0])
print('b1=',b[1])
print('b2=',b[2])
print(b[0].shape)
a=np.stack([a0,a1,a2],axis=2)
print('a=',a)
print(a.shape)
b0=a[:,:,0]
b1=a[:,:,1]
b2=a[:,:,2]
b0=b0.reshape(a.shape[0],a.shape[1])
b1=b1.reshape(a.shape[0],a.shape[1])
b2=b2.reshape(a.shape[0],a.shape[1])
print('b0=',b0)
print('b1=',b1)
print('b2=',b2)
print(b0.shape)
if __name__=='__main__':
main()
Output
(skipped)
(4, 5, 3)
(skipped)
(4, 5)
mergeで3枚のモノクロ画像を1枚の3チャンネル画像にする
splitで1枚の3チャンネル画像を3枚のモノクロ画像にする
stackで3枚の画像を1枚にすることもできる
スライスで1枚の画像を3枚にすることできる
C++
#include <iostream>
using namespace std;
#include <opencv2/opencv.hpp>
using namespace cv;
int main(int argc, char** argv)
{
Mat aa[3];
aa[0] = (Mat_<int>(4, 5) <<
111, 121, 131, 141, 151,
211, 221, 231, 241, 251,
311, 321, 331, 341, 351,
411, 421, 431, 441, 451);
aa[1] = (Mat_<int>(4, 5) <<
112, 122, 132, 142, 152,
212, 222, 232, 242, 252,
312, 322, 332, 342, 352,
412, 422, 432, 442, 452);
aa[2] = (Mat_<int>(4, 5) <<
113, 123, 133, 143, 153,
213, 223, 233, 243, 253,
313, 323, 333, 343, 353,
413, 423, 433, 443, 453);
Mat a;
merge(aa, 3, a);
cout << "a=" << a <<
endl;
cout << a.rows << " " <<
a.cols << " " << a.channels() << endl;
Mat b[3];
split(a, b);
cout << "b0=" << b[0] <<
endl;
cout << "b1=" << b[1] <<
endl;
cout << "b2=" << b[2] <<
endl;
cout << b[0].rows << " "
<< b[0].cols << " " << b[0].channels() <<
endl;
return 0;
}
Output
(skipped)
4 5 3
(skipped)
4 5 1
mergeで3枚のモノクロ画像を1枚の3チャンネル画像にする
splitで1枚の3チャンネル画像を3枚のモノクロ画像にする